27 Jan Installing Magnesium Wall Board Safely and Efficiently
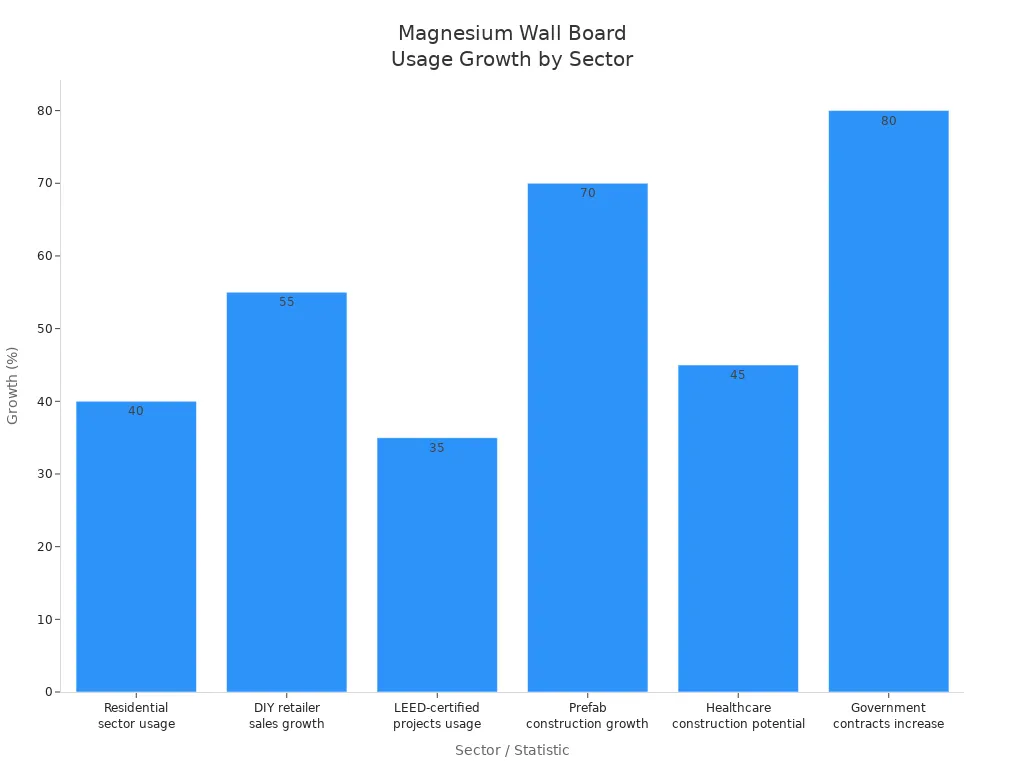
You can put up magnesium wall board safely if you plan ahead. First, get your tools ready, wear safety gear, and read the instructions. Good planning helps you not make mistakes and keeps things easy. Magnesium wall board is now very popular in homes and businesses. There was a 40% rise in home use and a 55% jump in DIY sales.
If you follow the instructions, your walls will be strong. They will also resist fire, water, and bugs. The steps are framing, getting the surface ready, measuring, cutting, fastening, treating joints, and finishing. Many people ask experts for help with mgo board installation. But you can do it yourself if you go slow. If you are not sure, you can always ask an expert for help with mgo board installation. Putting up mgo board does not have to be hard. If you are patient and use the right steps, your walls will last for years.
Statistic Description | Value |
|---|---|
Increase in residential sector usage | 40% |
DIY retailer sales growth | 55% |
Increase in LEED-certified projects usage | 35% |
Projected growth in prefab construction | 70% |
Growth potential in healthcare construction | 45% |
Increase in government contracts | 80% |
CAGR from 2019 to 2023 | 3% |
Number of LEED-certified projects in 2023 | 3,500 |
Key Takeaways
Get your tools and materials ready before you start. This helps you not make mistakes and makes the job easier.
Always wear safety gear like glasses and masks. You need to protect yourself from heavy and sharp things.
Make sure the surface is clean, flat, and dry before you start. This helps the wall board last longer and look better.
Leave small gaps between the boards. This lets the boards move and stops cracks from temperature changes.
Seal the seams and fill screw holes when you finish. This makes the wall board stronger and keeps out water and air.
Tools, Materials, and Safety for MgO Board Installation
Essential Tools and Materials
Before you start your mgo board installation, you need to gather the right tools and materials required for the job. Having everything ready makes the installation smoother and helps you avoid mistakes. Here are the main tools and materials for installing mgo board:
Magnesium oxide board: Pick boards that meet fire safety standards. Check for any damage before you use them.
Corrosion-resistant screws: These keep the boards secure and stop rust from forming.
Adhesive: Use this to bond the boards firmly to the wall or ceiling.
Polyurea or modified epoxy seam filler: This fills the gaps between boards for a smooth finish.
Underlayment: This material gives the boards a stable base and helps reduce movement.
Carbide tipped scoring knife: Use this tool to score and cut the boards.
Dust reducing circular saw: This tool helps you cut boards with less dust in the air.
Fiber cement shears: These give you clean, precise cuts.
Tip: Always double-check your tools and materials required before you start. Missing one tool can slow down your project.
You will use these tools and materials for installing mgo board on every project. Make sure you keep your boards dry and store them flat until you are ready to use them.
Safety Gear and Handling Tips
Safety should always come first when you work with magnesium oxide board. The boards can be heavy and have sharp edges, so you need to protect yourself. Here is what you need:
Safety glasses: These keep dust and debris out of your eyes.
Dust mask or respirator: This stops you from breathing in small particles when you cut the boards.
Gloves: These protect your hands from sharp edges and tools.
Ear protection: Use earplugs or earmuffs if you use loud power tools.
Note: Carry boards vertically to avoid breaking them. Keep the boards dry at all times. Wet boards can warp or lose strength.
When you cut boards, use wet suppression or a HEPA vacuum to control dust. Clean up dust right after cutting. This keeps your workspace safe and tidy. If you follow these safety tips, you will have a smoother and safer installation.
Preparing for Magnesium Wall Board Installation
 Framing and Surface Preparation
 Framing and Surface Preparation
You want your magnesium wall boards to last, so start with strong framing and careful site preparation. Begin by checking that all studs are straight and square. Use a level to make sure the framing lines up. If you see any crooked or loose studs, fix them before moving on.
Getting the surface ready for mgo boards is a key step. Here’s a simple checklist to guide you:
Check and clean the surface. Look for cracks, holes, or uneven spots. Fill any gaps and sweep away dust or dirt. Clean surfaces help the boards stick better.
Make sure the surface is flat and dry. Use a spirit level to spot uneven areas. Sand down bumps or fill dips. Dry surfaces prevent warping and mold.
Measure and plan for proper placement. Mark the layout on the wall and leave a small gap between boards for expansion.
Site preparation matters. If you skip it, you might see problems later. Take your time with getting the surface ready for mgo boards. A clean, dry, and level surface gives you the best results.
Tip: Always double-check your site preparation before you start installing. Small mistakes can lead to big headaches later.
Inspecting and Acclimating Boards
Before you install, inspect each board for damage. Look for chips, cracks, or moisture spots. Damaged boards can weaken your wall.
Next, acclimate the boards to the room. Remove the packaging and place the boards in the installation area. Let them sit for at least 48 hours. This step helps the boards adjust to the temperature and humidity. If you skip acclimation, the boards might warp or expand after installation, especially in rooms with high humidity.
Site preparation includes making sure the boards are ready for the environment. When you take time to acclimate, you help prevent future problems. You want your surface to stay smooth and strong for years.
Measuring and Cutting Magnesium Oxide Board
Accurate Measuring and Marking
You want your walls to look neat and last a long time. Start with measuring and planning for proper placement. This step helps you avoid mistakes and wasted boards. Grab a tape measure and a square ruler. These tools help you get straight lines and the right size every time.
Measure the height and width of the area where you will install the boards.
Mark the boards with a pencil before you start cutting mgo boards.
Double-check your marks to make sure they match your surface.
Tip: Always measure twice before you cut. This saves you time and keeps your boards from going to waste.
Measuring and planning for proper placement also means checking the surface for bumps or dips. If you see uneven spots, fix them before you mark your boards. A smooth surface helps the boards fit tight and look professional.
Cutting Techniques for Clean Edges
Cutting mgo boards can seem tricky, but you can do it with the right tools and a steady hand. Use a carbide-tipped scoring knife for straight cuts. If you need to cut many boards, try a dust-reducing circular saw. This keeps your workspace clean and helps you breathe easy.
Here’s a simple way to get clean edges:
Place the board on a flat surface.
Score along your marked line with the knife.
Snap the board along the scored line.
Use fiber cement shears for small cuts or corners.
Note: Always wear safety glasses and a dust mask when cutting mgo boards. The dust can irritate your eyes and lungs.
Cutting mgo boards on a clean surface helps you get smooth edges. If you rush, you might chip the board or make a crooked cut. Take your time and check your work after each cut. You want every board to fit snug against the surface and look sharp.
A good cut makes the next steps easier. You will have fewer gaps and a better finish. Cutting mgo boards the right way gives your project a strong start.
Installing MgO Board on Walls
Dry Fitting and Board Placement
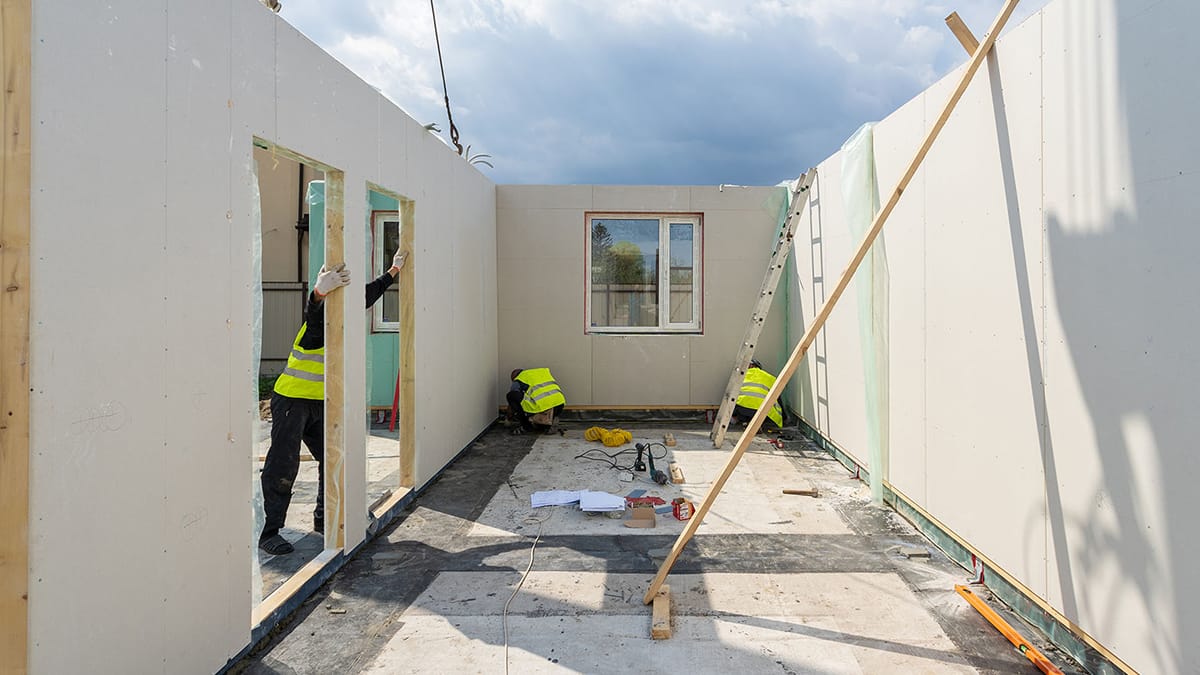 Dry Fitting and Board Placement
You want your mgo board installation to look smooth and last for years. Start by dry fitting the boards before you fasten anything. This step helps you spot mistakes early and keeps your project on track. First, make sure you have acclimated the boards for a few days in the room where you will install them. Turn on the HVAC system so the boards get used to the temperature and humidity. This prevents cracks and warping later.
Measure each wall with a tape measure. Use a T-square to mark straight lines on the boards. When you lay out the boards, always leave a small gap—about 1/8 inch—between each one. This gap lets the boards expand and contract as the weather changes. If you use steel framing, you can leave a 1/16 inch gap, but with wood framing, stick to 1/8 inch.
Support every board end with framing. Start laying the mgo boards from one side of the wall and work your way across. This keeps the wall even and avoids stress on the material. Dry fitting helps you see if the boards fit right before you start fastening the boards securely.
Tip: Always place the smooth side of the boards facing out. This gives you a better finish and makes painting or sealing easier.
Fastening Methods and Expansion Gaps
Now you are ready for the most important part of mgo board installation—fastening the boards securely. You want your walls to stay strong and flat, so use both glue and screws. Start by priming the frame with construction glue made for mgo. Apply the glue in a zigzag pattern. This spreads the material evenly and helps the boards stick tight.
After you glue, use galvanized nails or stainless steel screws to fasten the boards. Place fasteners at regular intervals, about every 8 inches along the edges and every 12 inches in the field. This stops the boards from sagging or shifting over time. Always keep the fasteners at least 3/8 inch from the edge of the board to prevent cracks.
When laying the mgo boards, remember to keep those expansion gaps. Here’s a quick guide:
Leave a 1/8 inch gap between each board and at the corners when using wood framing.
Use a 1/16 inch gap for cold-formed steel framing.
Always keep a 1/8 inch gap at adjoining walls.
These gaps let the boards move a little as the temperature and humidity change. If you skip this step, your walls might crack or buckle.
Note: Protect any exposed edges with a high-quality edge sealer or primer. This keeps moisture out and helps the material last longer.
Handling Corners and Openings
Corners and openings need extra care during mgo board installation. When you reach a corner, make sure both boards meet with a clean, straight edge. Keep the expansion gap at the corner, just like you do between boards. If you need to cut around windows, doors, or outlets, measure carefully and mark the board before cutting.
Support all cut edges with framing. This stops the boards from flexing or breaking. When laying the mgo boards around openings, keep the same expansion gap—1/8 inch for wood, 1/16 inch for steel. Double-check that the boards fit snug but do not press too tight against the frame.
Tip: Always dry fit boards around tricky spots before fastening the boards securely. This helps you avoid mistakes and keeps your walls looking sharp.
After you finish installing mgo board around corners and openings, seal the edges with primer or edge sealer. This step protects the material from moisture and keeps your walls strong.
By following these steps for mgo board installation, you make sure your walls stay flat, strong, and ready for finishing. Take your time with laying the mgo boards, and always check your work as you go. You will get a professional result that lasts.
Sealing Joints and Finishing MgO Board
Sealing Seams and Filling Screw Holes
You have finished fastening the boards, but your mgo board installation is not complete yet. Now, you need to seal every seam and fill all screw holes. This step keeps your walls strong and stops water or air from sneaking in. If you skip this part, your mgo board installation might not last as long as you want.
Start by checking each seam between the boards. Look for gaps or spaces. Fill these with a non-shrinking caulk. This caulk blocks water and air, which helps your mgo board installation stay solid. Next, grab self-adhesive fiberglass tape. Place this tape over every seam. The tape holds the boards together and stops cracks from forming later.
After you tape the seams, you need to cover them with joint compound. Pick a joint compound that works well with mgo boards. Many people like RF-134 Hybrid Jointing Compound. This product has a strong epoxy and PU base. It sticks well to mgo and other building materials. It also stays flexible, so it can handle movement and vibration without cracking. Spread the compound over the tape using a joint knife. Make sure you cover every seam and smooth out the surface as much as you can.
Now, look at the screw holes in your boards. You want a flat, even surface for your mgo board installation. Fill each screw hole with the same joint compound. Let the compound dry all the way. This step is important for a smooth finish.
Here’s a quick checklist for sealing seams and filling screw holes:
Fill all seams with non-shrinking caulk.
Place self-adhesive fiberglass tape over every seam.
Cover the tape with joint compound using a joint knife.
Fill all screw holes with joint compound.
Let everything dry completely.
Tip: Always check for low spots after the compound dries. If you find any, add more compound and let it dry again.
When you finish this step, your mgo board installation will look much better. The seams and screw holes will disappear, and your walls will feel strong and ready for the next step.
Sanding and Surface Preparation
You want your mgo board installation to look smooth and professional. Sanding is the secret to a great finish. After the joint compound dries, grab some fine-grit sandpaper. Sand every seam and screw hole until the surface feels flat and even. Pay extra attention to the edges of the boards. Sometimes, these spots feel sharp or uneven after mgo board installation. Sand them until they feel smooth.
Don’t forget to wipe away all the dust after sanding. Dust can mess up your paint or sealer. Use a clean, damp cloth to wipe the surface. This step helps your mgo board installation look clean and ready for finishing.
Here are some sanding tips for mgo board installation:
Use fine-grit sandpaper for the best results.
Focus on seams, screw holes, and board edges.
Sand until the surface feels flat and smooth.
Wipe away all dust before you move on.
Note: If you see any spots that still look low or rough, add a little more joint compound. Let it dry, then sand again.
When you finish sanding, your mgo board installation will have a perfect surface. Now, you can seal the wall with a clear water-based or polyurethane sealer. This step protects the mgo boards from water and dirt. It also makes the material last longer.
A smooth, clean surface is the best way to finish your mgo board installation. Take your time with this step. Your walls will look great and stay strong for years.
Final Steps and Best Practices for MgO Board Installation
Priming, Painting, or Sealing
 Priming, Painting, or Sealing
You want your mgo boards to look great and last for years. After you finish sanding, it’s time to prime, paint, or seal the surface. Pick a primer that works with concrete or masonry. This type of primer sticks well to the alkaline surface of mgo boards. Many paint brands react with the cement in MagPanel, giving you a tough, UV-resistant finish. You can also use acrylic stucco topcoats or polymer modified cement base coats for extra protection.
Before you cover the whole surface, test the bonding. Brush or spray a small area of your mgo boards with paint or sealer. Let it dry and cure. Make an X with a razor knife, stick masking tape over the cut, and rip it off. If the paint stays put, you’re good to go.
Here’s a quick list for finishing your mgo boards:
Use a primer made for concrete or masonry.
Try acrylic stucco or polymer modified cement topcoats.
Always test the bonding before full application.
Seal the surface to block moisture and dirt.
A good finish keeps your mgo boards strong and looking fresh. You protect the material from water, mold, and sunlight.
Quality Check and Common Mistakes
You want your installation to last as long as possible. Magnesium wall board beats drywall in durability. It keeps its strength, resists moisture, and never grows mold. MgO boards can last at least 33 years, even in tough places. They hold nearly all their flexural strength after many cycles, while drywall loses a lot.
Check your work with this table:
Quality Control Step | Description |
|---|---|
Inspect Concealed Pipelines | Make sure all hidden pipes are set before you install mgo boards. |
Verify Materials and Placement | Confirm all boards and framing match your plan. |
Inspect MGO Boards | Boards should be flat, clean, and undamaged with smooth joints. |
Compliance with Standards | Follow all design and building codes. |
Reinforce Material Handling | Handle boards carefully to avoid damage. |
Indoor Placement | Move boards indoors using mechanical lifts. |
Dry Storage | Store boards in a dry place to stop moisture damage. |
Follow Manufacturer Instructions | Always use the manufacturer’s guidelines for handling and storage. |
Timely Installation | Install boards soon after delivery for best results. |
Prepare Joint Compound | Mix joint compound well and let it sit before use. |
Clean the Joints | Make sure joints are free of debris before filling. |
Fill the Joints | Press compound into joints until level with the surface. |
Watch out for these common mistakes:
Don’t store mgo boards on uneven surfaces. Keep them flat and strong.
Protect boards from water with covers or membranes.
Use carbide tools for cutting and wear a dust mask.
Pick corrosion-resistant screws to avoid damage.
Leave a small gap between boards for movement.
Seal edges and joints with mold-resistant adhesives.
If you follow these steps, your mgo boards will stay strong and look good for a long time. You get a professional finish and avoid problems down the road.
You can handle mgo boards with confidence if you follow each step. Start by cleaning the surface and checking the framing. Place mgo boards from the bottom and attach them with screws. Seal seams with weather-resistant tape. Inspect your mgo boards for loose screws and neat edges. Store mgo boards flat and keep them dry. Acclimate mgo boards in the room for two days. Always wear a dust mask when cutting mgo boards. Use stainless steel fasteners and support mgo boards at the ends. Leave a gap for expansion. Review manufacturer instructions before installation. Your mgo boards will stay strong and look great.
Here’s a quick checklist for mgo boards:
Clean the surface and check framing.
Install mgo boards from the bottom up.
Seal seams and fill gaps.
Acclimate mgo boards before use.
Wear safety gear when cutting mgo boards.
Use proper fasteners and support mgo boards.
Leave expansion gaps.
Always follow manufacturer instructions.
Aspect | Instructions |
|---|---|
Fastening | Use 316-stainless steel fasteners or ceramic coated fasteners. Fasteners should be placed 6″ apart. |
Safety | Wear a dust mask and safety glasses. Use wet suppression or HEPA vacuum for cleanup. |
Board Support | Always support board ends by joists and leave 1/8″ gap for expansion. |
Fastener Installation | Install fasteners no closer than 4″ from corners and 9/16″ from the board edge. |
FAQ
How do I keep magnesium wall boards from getting damaged before installation?
Store boards flat in a dry place. Keep them away from water. Carry boards vertically. Check for chips or cracks before you start.
What tools do I need for cutting magnesium oxide boards?
You need a carbide-tipped scoring knife, fiber cement shears, and a dust-reducing circular saw. Always wear safety glasses and a dust mask when you cut.
Can I paint magnesium wall boards right after installation?
Yes, you can paint them after you finish sanding and sealing the joints. Use a primer made for concrete or masonry. Test a small spot first to make sure the paint sticks.
What safety gear should I wear during installation?
You should wear safety glasses, gloves, a dust mask, and ear protection. These keep you safe from dust, sharp edges, and loud tools.
Why do I need expansion gaps between boards?
Expansion gaps let the boards move when the temperature or humidity changes. This stops cracks and keeps your walls strong for years.